How to Build the Best Racing Drone?
The best drone is the one you build yourself!
Nothing is quite as rewarding as spending your nights tinkering away, putting together and then flying your very own FPV racing drone. There are some challenging bits along the way, but once you have all the information needed, and a small push in the right direction, it’s really quite easy to get started.
Better value for money, higher quality components, and overall a much more enjoyable experience; these are just some of the reasons why you should build your first racing drone.
If you want to fly a racing drone, anyone with experience will tell you to build it yourself!
If you are considering building your own racing drone, in the following article we will show you the simplest and most effective racing build available.
Tip: If you want to learn how to build any type of drone, a racing drone is a good start.
Which size platform should I start out on?
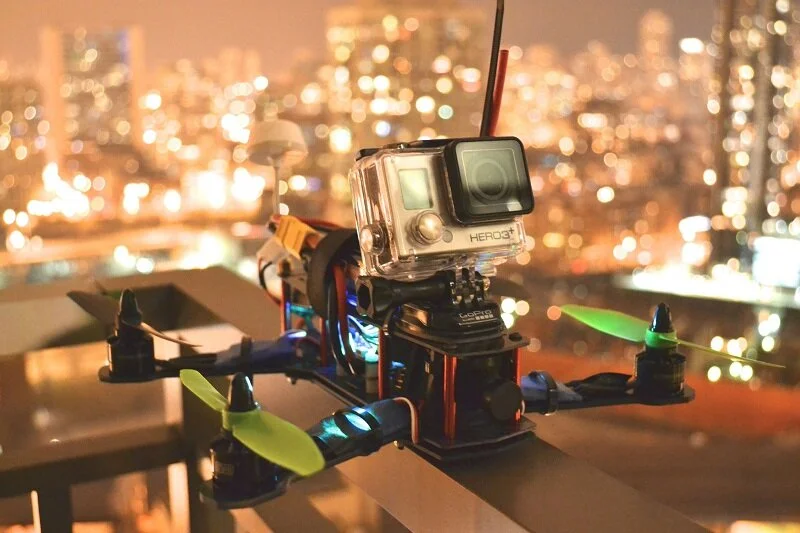
Answer: 250mm Frame
It is best to start out with something that works straight off the bat, and gives you minimal hiccups. And 250mm sized frame does just that!
It’s hard to go past the famous 250mm frame configuration (ZMR250 shown above). There are many reasons to go this route. Easy to setup, flexible upgrades, and many people are already flying this drone with great success.
Because of its popularity, there is already plenty of information online, which shows you how to do everything, step-by-step.
Flight Controllers (F3 and F4)
There are approximately 187 flight controllers on the market today. This can make things difficult to chose from, but we will focus on two versions that cover most of these. The models that represent the best value for money, while still providing nice features are the F3 and F4 Flight Controllers.
A combination of these along with the software Betaflight is a great starting point for a beginner.

Betaflight F4 Controller
Both of these make your racing drone easy to tune. Once the drone is in the air, these flight controllers should also be forgiving to fly. There are far newer flight controllers today, ranging all the way up to F7. These Flight Controllers do offer newer features, however their price is usually unwarranted.
UART port numbers, processor speed, loop times; all these considerations are worth doing your homework on, but for most beginners a F3 Flight Controller is more than enough to get started.
Include High-Quality Drone Components
In order to finish your drone build, you will need four motors, four Electronic Speed Controllers, a radio receiver, and FPV video camera.
The best thing when building your own drone, is you can mix and match the best components, for you money.
5" diameter propellers with a 3”pitch

The standard 5030 propeller
For the standard racing drone, the amount of thrust you need to hover should be easily provided by four propellers, each with a 5 inch diameter. In the beginning you will crash, so it is best to start out with a few dozen cheaper propellers, as they will bend and break as you learn how to fly.
2300kv Brushless Motors
Also, for your first racing drone you will want a motor that spins approximately 2300 times per minute, per volt that runs through the motor coils.
This is where the 2300kv value comes from.
For example: When using a 3S battery (12.6V) our propellers will spin at approximately 12.6 x 2300 RPM. This will work out to be around 30,000 RPM
As long as you have the kv correct, you’re 5 inch props will provide the required thrust for this size drone.

20 Amp Electronic Speed Controllers

If you’re going to run high powered 3 and even 4 cell LiPo batteries, you want a high amperage ESC.
It’s good to leave a little head room, so a 20amp ESC is a good start.
When looking at motor thrust tables, simply find the maximum amperage for your chosen propeller, and add 10 or 20% extra amps, as a buffer.
Rx Receiver (RC radio connection)
A four channel 2.4GHz receiver gives you plenty of headroom for connectivity and the ability to have both RSSI (PWM) and CPPM output makes wiring up a breeze.
Your transmitter needs to match your receiver, as many providers offer different protocol (software).
Check these compatibility issues whenever purchasing new radio equipment.

Analog video camera

In order to get the low lag required for FPV video, analgo cameras are used. This is because it only takes 50 milliseconds or so for the video to come back and be displayed on your screen. If it takes longer, then your drone will be in a different spot and you can’t control your drone.
The only real consideration for your FPV camera is that it should have a focal point of around 2.3mm. A 2.1mm or even shorter will give you a wider angle view, so you can see more on your screen.Don’t go too wide, however, otherwise you won’t be able to see your surrounds.
14.8 Volt Electronics - 4S
All racing drone pilots use 3 cell batteries when starting out. But it doesn’t take long until you upgrade to 4 cells. A simple consideration is to plan ahead and build a racing drone that can use 4 cell batteries from the start. Don’t forget this important step to future proof your design.

When building a racing drone many people miss this important step!
Putting it all together
There are a few directions you can take if you want to put the racing drone kit together yourself…
Option 1) Buy a kit from Buzz Drones
We have to float our own boat at some stage, and if you want everything all laid out step-by-step then it’s best to buy the kit from us. We include all the parts, important tools like a soldering iron, plus an instructional guide on how to put the drone together. You can even buy recommended FPV and transmitter options too.
Option 2) DIY
YouTube! Seriously everything is on YouTube.
If you decide to buy all the parts and put them together yourself, it is simple enough to do so.
Also it is quite safe as you are only dealing with low voltages. The biggest risk is probably getting burnt by the soldering iron!

Do I need to learn how to solder?
The short answer is yes. But don’t worry, soldering is actually a lot of fun! Also it wont take you long to learn how, I soldered my Naze32 FC board with only a few hours practice so it’s fairly simple really. If you want to make life even easier you can always get your FC board pre-soldered.
Other important considerations..
Choose a reliable transmitter
Going the the DIY route also gives you the flexibility to choose your own transmitter.
This allows you to pick the best value for money, according to your budget.
There are two options for transmitters that we recommend. Perfect for all types of drones, these high quality radios are made specifically by brands that pride themselves on radio technology.
Radiolink T8S
This radio is an easy to use 8 channel transmitter that will do pretty much everything you ever wanted.
Oh and it usually costs less than $100. What more could you want?
The Radiolink T8S is a great entry level Tx that ticks all the right boxes.

The Radiolink includes a reliable 2.4GHz band receiver with a real life range of up to 2km. The simple erganomic design make it easy for new pilots to handle, and it can be charged easily via USB.
It supports all the regular receiver protocols including SBUS, PPM and PWM. Also included is a fully capable mixer, with flight mode programs all editable via software.
Something a little more advanced…
The FrSky Taranis QX7
The Taranis QX7 is a great mid level radio transmitter, one that offers a whole host of benefits.
Being a full form controller, it has preferred ergonomics for those looking for the typical sized transmitter. It also comes with a number of switches and knobs to allocate channels too.
All of the customization is easily controllable with OpenTX, the gold standard in RC software.

Most important of all it is made by FrSky. Arguably the largest and most successful radio transmitter company.
Some of the reasons why you would chose this transmitter are because of the replaceable LiPo battery, large LCD screen, good build quality, and being compatible with FrSky’s leading Rx receivers.
A controller that will last you a lifeitme

The FrSky Taranis X9D+ Plus
Arguably, the most popular radio transmitter on the planet, the Taranis X9D+ is top of the line.
If you are looking for superior aircraft control, the Taranis offers just that extra level of control, needed for fast paced paced drone racing.
A step up in gimbal stick technology, it has some of the most reliable electronic components available. 16 channels, powerful open source software (OpenTX), solid build quality, and a top notch LCD screen, what more could you want?
Choose a LCD screen and FPV goggles
Using a LCD monitor is the preferred set-up, especially if this is your first time flying FPV. It’s important to note that seasoned pilots use an LCD screen as backup, so when you buy a LCD screen you will make good use of it.
Recommended LCD Screen Options
Blank screens are a huge issue! A loss of connection means you are pretty much destined to have a severe crash. You can go with something cheap like this $20 display from Banggood, but it seriously isn’t recommended for a number of reasons.
Your LCD monitor is a vital part of your drone flying experience and in this case, you get exactly what you pay for. To avoid poor quality monitors be prepared to invest some money here, but it’s worth it – you will save many times your investment in the long run.
Eachine 5802D
DVR Recording Video
Diversity = consistent signal
Bright display (600 cd/m2)
The Eachine 5802D offers a nice 7” monitor, good battery life, and most importantly a rock solid connection that won’t drop out on you.

The Eachine 5802D is a great LCD screen that will remain connected to your drone at all times. DVR is great if you want to record back some of your fast action flying. The diversity function allows for better connection redundancy, essentially using two different signals at once. The brightness pf 600 cd/m2 will give you great visibility in most conditions.
Where to next?
If you are at all serious about making drones a hobby then it really pays to get your hands dirty and build your own drone.
If you want to get a good taste of FPV without spending too much, the RTF options work well too. If you would like to read about more racing drones, you can check out the full guide to buying a racing drone here. This covers all the other steps you need to get up in the air, including rules, regulations, and drone safety.
For any other information please check out the useful blog & news articles here.
If you would like to check out other racing drone options, read about the best FPV drones available here.